Getting started with Slick!
Getting started with Slick is straightforward, thanks to its modular and middleware-centric design. To set up a basic application, you’ll begin by installing Slick using Composer, which automatically configures the core modules required for a functioning HTTP middleware stack.
From there, you can add optional modules as needed to extend your application’s capabilities, such as routing, security, and custom middleware. Slick’s dependency container handles all necessary configurations, allowing you to focus on building your application without worrying about complex setup procedures.
In just a few steps, you’ll have a functional environment ready to serve your HTTP requests.
Setup
Before getting started, make sure you have PHP 8.2 or higher installed on your system.
To set up Slick with all its dependencies, you’ll use Composer. If you haven’t installed Composer yet, please follow the installation instructions on the Composer website.
Once Composer is ready, run the following command to start your Slick setup:
composer create-project slick/webapp ./my-project
If you’re developing a web service, Slick also provides a template specifically designed for JSON API responses. This template is pre-configured to handle requests and respond with JSON formatted messages, making it easy to get started with API development. To set it up, run the following command:
composer create-project slick/webservice ./my-api
This will create a new project in the my-api directory, ready for you to start building your web service!
Running Your Application
To run your web application during development, you can use PHP’s built-in web server. Simply execute the following command in your terminal:
cd my-project
php -S localhost:8000 -t webroot
After starting the server, open your browser and navigate to http://localhost:8000 to begin your development journey!

Defining Routes
In the front controller pattern, the primary goal is to handle incoming requests by delegating them to specific controllers that process those requests. This delegation is managed by the Router, which plays a crucial role in determining which controller will handle each request.
The Router contains a collection of Routes, each defined with request target patterns, the corresponding controller names, handler methods, and any necessary arguments. When a request is made, the RouterMiddleware attempts to match it against this collection of Routes to identify the appropriate one. Once a match is found, the Dispatcher uses this information to invoke the correct controller and method, ensuring that each request is processed by the right handler.
The Route Attribute
PHP attributes provide a convenient way to define routes directly alongside the controller code associated with those routes. This feature is natively supported in PHP 8 and higher, allowing you to start using it immediately without additional configuration.
For example, if you want to define a route for the /blog URL in your application, you can create a controller class like this:
// src/UserInterface/BlogController.php
namespace App\UserInterface;

use Psr\Http\Message\ResponseInterface;
use Symfony\Component\Routing\Attribute\Route;

class BlogController
{
    #[Route('/blog', name: 'blog_list')]
    public function list(): ResponseInterface
    {
        // ...
    }
}
In this example, the #[Route] attribute is used to map the /blog URL to the list method of the BlogController. This approach keeps the routing information close to the controller logic, making it easy to manage and maintain your application’s routes.
The route name (blog_list in this example) isn’t crucial at this stage, but it will become essential later when generating URLs within your application. It’s important to ensure that each route name is unique across your application to avoid conflicts and ensure accurate URL generation.
Matching HTTP Methods
By default, routes will match any HTTP method (GET, POST, PUT, etc.). To restrict which HTTP methods a route should respond to, you can use the methods option:
// src/UserInterface/BlogController.php
namespace App\UserInterface;

use Psr\Http\Message\ResponseInterface;
use Symfony\Component\Routing\Attribute\Route;

class BlogController
{
    #[Route('/blog', name: 'blog_list', methods: ['GET', 'HEAD'])]
    public function list(): ResponseInterface
    {
        // ...
    }

    #[Route('/blog/article/{slug}', methods: ['PUT', 'POST'])]
    public function edit(string $slug): ResponseInterface
    {
        // ... edit an article
    }
}
In this example, the list method only responds to GET and HEAD requests, while the edit method is restricted to PUT and POST requests. This ensures that each route handles the appropriate HTTP methods for the desired actions.
Debugging Routes
As your application expands, managing and debugging routes becomes increasingly important. Slick offers several commands to help with routing issues, and one of the most useful is the debug:router command. This command displays all of your application’s routes in the exact order Slick evaluates them:
bin/console debug:router
The output will look something like this:
This output provides a clear overview of your routes, helping you troubleshoot and optimize your application’s routing configuration.
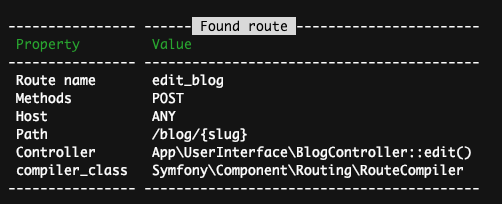
If you provide the name (or part of the name) of a specific route as an argument, the debug:router command will display detailed information about that route:
bin/console debug:router edit_blog
The output will look like this:
This detailed output includes the route’s properties, making it easier to understand how the route is configured and troubleshoot any issues.
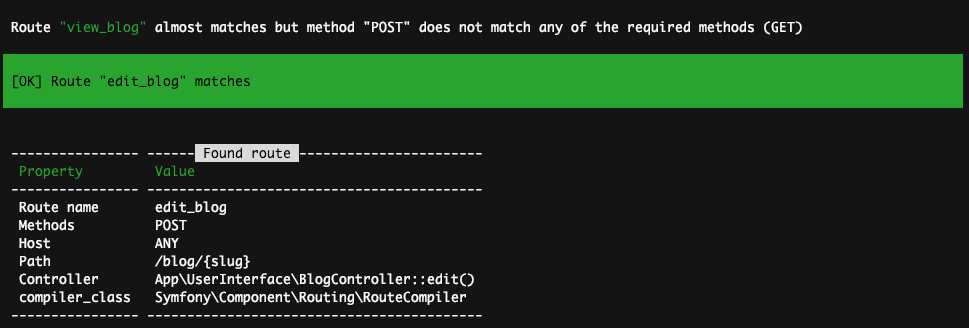
Another helpful command is router:match, which shows which route will match a given URL. This is particularly useful when a URL isn’t triggering the expected controller action:
bin/console router:match /blog/my-blog-article --method POST
The output will resemble this:
This command helps identify why a specific URL may not be behaving as expected, making it a valuable tool for debugging route issues.
Route Parameters
In some of the previous examples, routes had static URLs (e.g., /blog). However, it’s common to define routes where parts of the URL are dynamic. For instance, the URL for displaying a specific blog post might include the title or slug, such as /blog/my-first-post or /blog/all-about-slick.
Variable parts of the URL are wrapped in curly braces { }. For example, to display a blog post, you might define a route like /blog/article/{slug}:
// src/UserInterface/BlogController.php
namespace App\UserInterface;

use Psr\Http\Message\ResponseInterface;
use Symfony\Component\Routing\Attribute\Route;

class BlogController
{
    #[Route('/blog/article/{slug}', name: 'blog_show')]
    public function show(string $slug): ResponseInterface
    {
        // ... show an article
    }
}
In this example, {slug} is a placeholder for the variable part of the URL. When a user visits /blog/my-first-post, the Slick dispatcher will execute the show() method in the BlogController and pass $slug = 'my-first-post' as an argument to the method.
You can define multiple parameters in a route, but each parameter must be unique within that route. For example, /blog/posts-about-{category}/page/{pageNumber} could include both a category and a page number as dynamic parts of the URL.
Optional Parameters
Consider the route path /blog/posts-about-{category}/page/{pageNumber}. If a user visits /blog/posts-about-slick/page/1, it will match the route. However, visiting /blog/posts-about-slick/page will not match because the {pageNumber} parameter is missing, and any parameter added to a route must have a value by default.
To make it work when users visit /blog/posts-about-slick/page, you can assign a default value to the {pageNumber} parameter. Default values are defined directly in the method arguments of the controller:
// src/UserInterface/BlogController.php
namespace App\UserInterface;

use Psr\Http\Message\ResponseInterface;
use Symfony\Component\Routing\Attribute\Route;

class BlogController
{
    #[Route('/blog/posts-about-{category}/page/{pageNumber}', name: 'blog_show_category')]
    public function byCategory(string $category, int $pageNumber = 1): ResponseInterface
    {
        // ... article list by category
    }
}
In this example, if the pageNumber is not provided in the URL, it will default to 1, allowing the route to match /blog/posts-about-slick/page without any issues.
Working with controller
The controller is responsible for handling a specific request. Essentially, it’s a simple class with one or more methods linked to routes. When a route matches, the corresponding method in the controller is executed. Any required dependencies for the controller are either injected into the constructor or passed when the handler method is called. This makes the controller the central point for processing requests and generating responses.
Using the Request
When a Slick web application is initialized, a PSR-7 ServerRequestInterface instance is created and made available via the dependency injection container. You can access this request instance by including it as an argument in the method handling the request. Here’s an example:
// src/UserInterface/BlogController.php
namespace App\UserInterface;

use Psr\Http\Message\ResponseInterface;
use Psr\Http\Message\ServerRequestInterface;
use Symfony\Component\Routing\Attribute\Route;

class BlogController
{
    #[Route('/blog/search', name: 'blog_search')]
    public function byCategory(ServerRequestInterface $request): ResponseInterface
    {
        $query = $request->getQueryParams();
        // ... use $query params to perform a search
    }
}
In this example, the ServerRequestInterface provides access to the request details, such as query parameters, allowing the controller to handle the search functionality based on the incoming request.
Displaying Flash Messages
Flash messages are used to store notifications in the session that persist across one or more requests. Typically, these messages are removed after being displayed. Flash messages are especially useful with HTTP redirects, as no view is rendered during a redirect. The flash message is shown on the following request, after the redirection occurs.
// src/UserInterface/BlogController.php
namespace App\UserInterface;

use App\Application\UsersService;
use App\Domain\User\UserId;
use Psr\Http\Message\ResponseInterface;
use Psr\Http\Message\ServerRequestInterface;
use Slick\WebStack\Infrastructure\Http\FlashMessages;
use Symfony\Component\Routing\Attribute\Route;

class BlogController
{
    use FlashMessages; // Use FlashMessages trait for session flash handling

    public function __construct(private UsersService $users)
    {}

    #[Route('/blog/article/{slug}', methods: ['PATCH', 'POST'])]
    public function edit(string $slug, ServerRequestInterface $request): ResponseInterface
    {
        $data = $request->getParsedBody();
        try {
            $this->users->edit(new UserId($slug), $data);
            $this->success("User successfully updated!");
        } catch (\Exception $exception) {
            $this->error("Couldn't update user: {$exception->getMessage()}");
        }

        // ... continue to render the response or redirect
    }
}
In this example, the FlashMessages trait is used to add success or error messages to the session, which can then be displayed after an HTTP redirect. The message will be available in the next request, allowing feedback to be provided to the user.
Available methods to set session flash messages are:
- FlashMessages::success(): Success message, normaly something that user want it to happenm occurred;
- FlashMessages::info(): System information. User should be informed;
- FlashMessages::warning(): Informs the user of something is not worked or working properly
- FlashMessages::error(): Application fails to do something.
If you’re using slick/webapp, the slick/template module is already installed and enabled. To display flash messages in your templates, simply include the following snippet in your Twig template:
{{ include("flash-messages.twig") }}
This will render any flash messages stored in the session, allowing them to be displayed to the user.
Conclusion
By following this guide, you’ve gained an introduction to setting up and working with the Slick framework. You’ve learned how to install Slick, define routes, handle HTTP requests, and display flash messages to provide feedback to your users. The modular nature of Slick allows you to easily customize and expand your application as needed, leveraging powerful features like PSR-7 middleware, routing, and session management.
As you move forward, you can explore additional modules and functionalities provided by Slick, further enhancing your application. Whether building a small web app or a more complex service, Slick’s flexible architecture makes it an ideal choice for scalable and maintainable PHP applications.
With the foundations now in place, you’re ready to start developing your next web project using Slick!
What’s Next?
To continue exploring the Slick framework, a great next step is to follow the Chef’s Choice - Recipe Search Application tutorial. This guide will walk you through creating a dynamic recipe search application with Slick, giving you hands-on experience with its features and capabilities.


